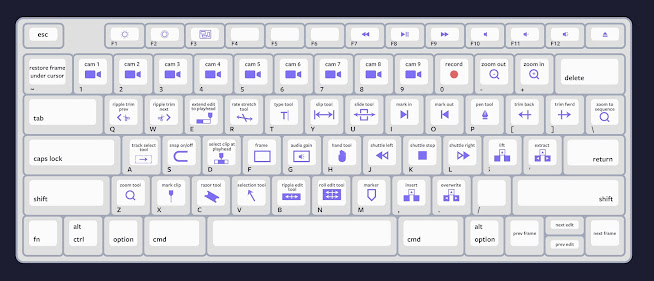
Posts

Showing posts from November, 2022

Lab 12: Editing

Image
☝Today, we will be editing Project #3;๐Ÿ“ผ If you want to add some video shots to your project, talk to me.  ๐Ÿ‘€ ๐Ÿ“นCheck out our slides about video and audio editing here .  ๐Ÿ“ ๐Ÿ“นProject #3 should be delivered at the end of lab 13;  ๐Ÿ“ข☝ IMPORTANT: Please submit all previous assignments in our shared file .  ๐Ÿ“ If you need any help or guidance with previous works, please talk to me or email - bolkvadzeemail@gmail.com;  ๐Ÿ““ I can meet with you via zoom or in person every Monday from 3:30-4:30 PM. ๐Ÿ’ผ The final exam will be Online starting Dec 15 at 9AM until Dec 16 at 11AM on the BB site. A study guide will be provided by Professor Martin Lucas shortly.  ๐Ÿ“ข☝ IMPORTANT:  If you want extra credit, you can attend an independent film screening and write your thoughts about it (250 words).  See below keyboard shortcuts  ๐Ÿ“ฃ

Lab 11: Filming project #3

Image
Before we start working on project #3 , ๐Ÿ”—let's refresh our knowledge: I created slides about  camera principles  ๐Ÿ”— from our previous classes. Follow these steps: Step 1 : Check out Canon ๐Ÿ”— and Sony ๐Ÿ”—  quick starts.  Step 2 : Check the battery! Step 3 : Format your SD card!  Step 4: Set up your camera according to the following settings:  Switch to "Manual"  Framerate: 24 fps  format: AVCHD Shutter speed: 1/50 (it should be = Framerate x 2) White balance: Automatic (AWB) Focus: Manual (MF) Step 5 : Take extra shots; more is always better than going back and reshooting.  When moving from one space to another, ensure your camera is set up correctly. For more, explore below:  Manuals for Sony can be found   here ๐Ÿ”—  Manuals for Canon can be found  here ๐Ÿ”— TODAY is due - blog #3 and storyboards. You should email me your storyboards - bolkvadzeemail@gmail.com and post links to your assignment in our shared drive - here ๐Ÿ”— During the following 2 labs, we will edit the vide

Lab 10: Storyboarding

Image
 Agenda for today: ๐Ÿ”˜Listening to audio projects;๐Ÿ“ป ๐Ÿค”Brainstorming for project #3 and storyboarding ๐Ÿง  ๐Ÿ“–Slides from  class  ๐Ÿ“– ๐Ÿ“‚Check out here project # 3 details ;๐Ÿ—„ ๐Ÿ“•You can find storyboard templates here  ๐Ÿ“– Your storyboard should include the following:  DUE Lab 11: You have to submit 250 words about editing analysis(Post the URL of your blog in our shared drive file) You can find a detailed description of your blog assignment here .  Scan or take a picture of the storyboard of your Project #3 and send it to me: bolkvadzeemail@gmail.com  Don't forget to post links to previous assignments in our shared file! Please attend our lab, and don't show up late!

Lab 9: Sound Editing & Design

Image
Editing someone else’s interview is an art form!  Today is due Project #2 by the end of our lab.  How to export audio files:  Choose on your timeline an in-point (I) and outpoint (O) File > Export > Media  OR   press the shortcut key Ctrl + M on PC or Cmd + M on Mac . Change name(Instead of Output name, put the desired name)  Pick - Mono format Format: AIFF Sample Rate: 48000Hz Sample Size: 24 bit After exporting audio from Adobe Premier Pro, please upload your piece to sound cloud. Embed the track to your blog: Create an account at  https://soundcloud.com/    Upload your audio to Sound Cloud Once the upload is done, press the save button  Once you are done uploading your file, click the "Share" icon  Select the “Embed” Tab, and COPY the entire code. Go to your blog, Open the HTML editor and paste it into the body of your post. Now, select the “view” tab again, and go out of the HTML view by selecting “Compose view.” Drop your blog post link in the Student Blogs and

Lab 8: Sound Design and Audio Editing in Premiere Pro

You can check slides from our class here .๐Ÿ—ƒ๐Ÿ“‚ If you missed the class on Monday, please edit your audio interviews(rough draft) for the following lab. We will discuss sound effects and adding music on the 7th. ๐Ÿซ ➜Here are some steps for audio editing: ➜ Before you start working on your audio files, remember the video editing class: ( Keeping your files organized ; Hotkeys ; Editing basics (page 21) other tutorials ) Store your files in proper folders.  Create a new project, and open a new sequence.   From the Window setting, switch to the audio editing panel. Convert stereo tracks to mono by right-clicking on your clip in the project panel and selecting Modify > Audio Channels. (Check out our slides, as I included screenshots) You can create labels by clicking M key on your keyboard.  You can experiment with your audio and choose different effects from the "Essential Sounds" Panel. Remember transitions, as they are handy. If you recorded a room tone, definitely use it.